Getting Started
Introduction
This public API is built using the light-weight architecture REST. Our API takes advantage of HTTP requests to post any data requests. This API encodes all requests, response bodies, and error codes in JSON.
Users are provided access to exclusive sandbox environment to test the application with live characteristics. The API uses authentication keys to validate every request received and grant further access to the API.
Through our different API endpoints, users can create, update, validate, and transmit the IRS tax returns. The API uses the concept of webhooks to instantly communicate the sender on status of tax forms. It also allows the sender to place a PDF download request through Webhooks.
OAuth 2.0 Authentication
OAuth2.0 is a HTTP authentication scheme that involves security tokens called Access tokens or JSON Web Tokens (JWT). Each request is authenticated with the access token.
The access token is a cryptic string, usually generated by the server in response to a request. The client must send this token in the Authorization header when making requests to protected resources.
Here are the steps on how you can get the JWT from TaxBandits:
Step 1: Retrieve the Authentication Keys
Retrieve the below 3 keys in Console site using your credentials. Navigate to Settings >> API Credentials
- Client ID
- Client Secret
- User Token
Note: Do not share the keys with any individual or business.

Step 2: Request the Access Token
To request an Access Token, you need to create a signature (JSON Web Signature) for Authentication. The JWS consists of 3 parts as given below,
- Header
- Payload
- Signature
Header:
{
   "alg": "HS256",     /*Algorithm = HS256*/
   "typ": "JWT"    /*Type = JSON Web Token (JWT)*/
}
Payload:
{
   "iss": "968a9c78dae29a29",     /*Issuer: Client ID retrieved from the console site*/
   "sub": "968a9c78dae29a29",    /*Subject: Client ID retrieved from the console site*/
   "aud": "a574b75f18b24fc09f9039ffb5cb08f3",    /*Audience: User Token retrieved from the console site*/
   "iat": 1516239022    /*Issued at: Number of seconds from Jan 1 1970 00:00:00 (Unix epoch format)*/
}
Signature:
HMACSHA256(
base64UrlEncode(header) + "." +
base64UrlEncode(payload),
siqHfLy59g3UHxrb5gjxg    /*Client Secret retrieved from the console site*/
)
Combine the Header, payload and signature to create the JWS.
Sample JWS
eyJhbGciOiJIUzI1NiIsInR5cCI6IkpXVCJ9.eyJpc3MiOi
I5NjhhOWM3OGRhZTI5YTI5Iiwic3ViIjoiOTY4YTljNzhkYWUyOWEyOSIsImF1
ZCI6ImE1NzRiNzVmMThiMjRmYzA5ZjkwMzlmZmI1Y2IwOGYzIiwiaWF0IjoxN
TE2MjM5MDIyfQ.HNQznxlPyVt62kyUeVwtk1-uzm1uDWH4NBDLShA6Ac0
Once the JWS is created, then send a request to the Authentication Server for an Access token.
Authentication Server URL:
Sandbox: [https://testoauth.expressauth.net/v2/tbsauth] Live: [https://oauth.expressauth.net/v2/tbsauth]
Once we receive a JWS from the client, TaxBandits will provide the JWT (Access token) to the client in the following format:
Header:
{
    "alg": "HS256",     /*Algorithm = HS256*/
    "typ": "JWT"    /*Type = JSON Web Token (JWT)*/
}
Payload:
{
    "iss": "968a9c78dae29a29",
    "sub": "968a9c78dae29a29",
    "aud": "a574b75f18b24fc09f9039ffb5cb08f3",
    "iat": 1516239022,
    "exp": 1516242622    /*Expiry: Number of seconds from Jan 1 1970 00:00:00 for the expiry. The Access Token is valid for 60 minutes*/
}
Signature:
HMACSHA256(
base64UrlEncode(header) + "." +
base64UrlEncode(payload),
siqHfLy59g3UHxrb5gjxg    /*Master Secret Key*/
)
Step 3: Use the Access Token to send API Requests
Once you obtain the JWT (Access token), you can determine its expiry by the “ExpiresIn” value in the Response. You will have to use the same JWT along with every API request until the token expires.
Example:
URL: [https://api.taxbandits.com/v1.7.3/form1099misc/create]
Authorization: Bearer eyJhbGciOiJIUzI1NiIsInR5cCI6IkpXVCJ9.eyJpc3
MiOiJ0ZXN0YXBpLnRheGJhbmRpdHMuY29tIiwiYXVkI
joiYTU3NGI3NWYxOGIyNGZjMDlmOTAzOWZmYjVjYjA4ZjMiLCJp
YXQiOjE1OTU5MjAxMjQsImV4cCI6MTU5NTkyNzMyNH0.BIg8764SOhOai9As
3uRSidrF1-B9CxL6D5z4OggcVbs
Content-Type: application/json
Forms supported by API
The API supports the following forms:
- Information Returns: W-2, Transmittal form W-3, W2C, 1099-MISC, 1099-NEC and Summary Tax Report 1096 along with other 1099 forms and 1099 corrections.
- Employment Tax Forms: 940, 940 Schedule R, 941, 941 Schedule R, 943 and 944.
- ACA Tax Returns: Forms 1094 C and 1095 C
Creation of Tax Form
Explore the event sequence below that leads to the creation of a tax form. Once you send a request to the API, its authenticity is verified through a series of validation checks before the actual creation of the form begins.
Request from the sender: The sender sends an API request to the CREATE API Endpoint so as to create a form.
Authentication of the request: The request is validated for authenticity before it is processed further.
Data Validation: Once the request is authenticated, the data across all fields are subjected to validation. The API does basic validation checks for key fields like Business Name, EIN, and SSN. If these fields pass the validation checks, the form is processed further, if not, the errors are updated through Response JSON.
Business Rule Validation: Records that clear data validation will be subjected to business validation checks. Here, the data are validated against a set of business rules. Records that fail business validation are updated through Response JSON along with the errors observed.
Process the Information: Records that clear business validation are processed further and their respective statuses are communicated in Response JSON through a collection of Success Records.
Create Form: The API will create forms for records that clear the business validation. The response to this create request will have a Submission ID and Record ID unique to a return which needs to be referenced for that particular return across all API calls.
Update Form: To update/change any information, an API request has to be sent to the UPDATE API Endpoint.
Validate Form: To validate a return for business rules, an API request has to be sent to the VALIDATE API Endpoint. Validation is generally done before transmitting the form to the IRS.
Transmit Form: When the return is ready for transmission, an API request has to be sent to the TRANSMIT API Endpoint. And then, the e-filing process is initiated.
Handling Errors in Response: In order to assist the sender to understand the error codes, the unique error codes are made available in Response JSON.
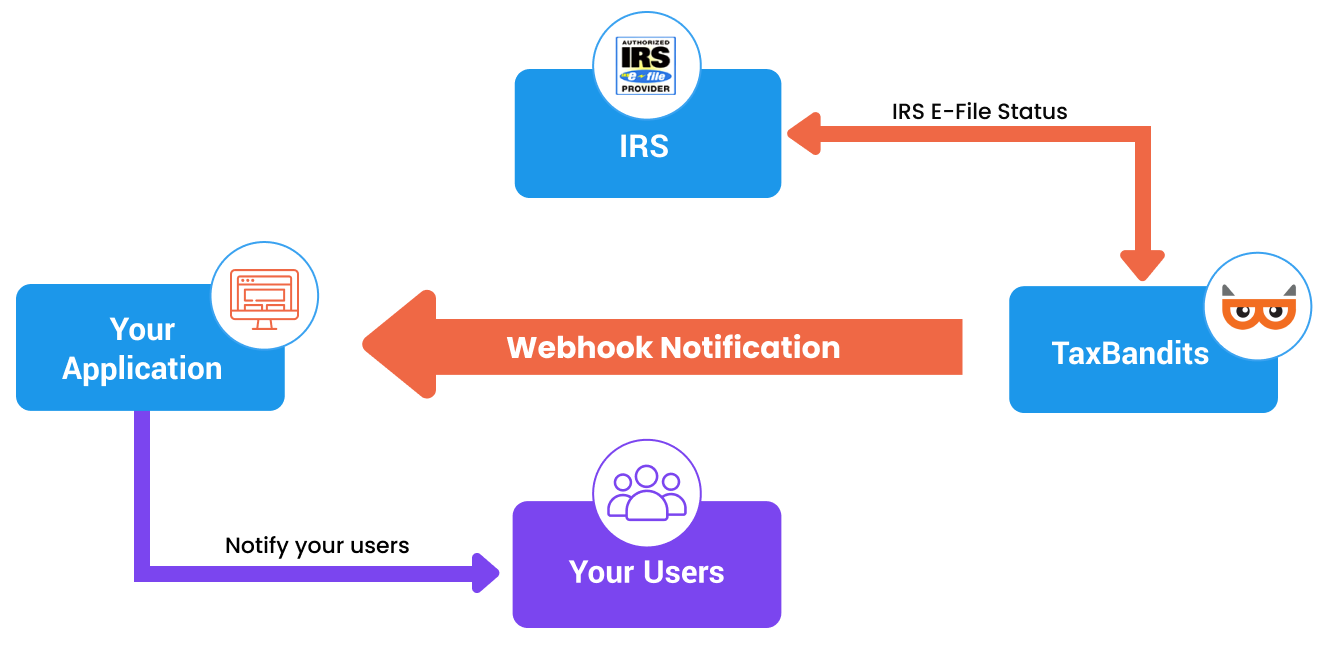
Receive the status of return using Webhooks: The API uses Webhooks to communicate the filing status to the sender. The Webhooks URL has to be configured in the Sandbox account.
Download PDF using Webhooks: An API request has to be sent to the GETPDF API Endpoint to download the PDF form. In turn, the request is processed offline, PDFs are generated and saved in a secure path. The sender is communicated on the secure location path through Webhooks.
Sandbox Environment
The API offers a sandbox environment for you to test the characteristics of the actual production environment and to obtain simulated responses from all API methods. In order to access the sandbox environment, the user needs to raise a request for developer access to the Taxbandits API.
The request can be made through https://developer.taxbandits.com/
The API reviews the user request and in response creates a developer account for the user in the sandbox environment. Once the account is created, the user will receive an email on the credentials that include the public and private keys for accessing the developer account through https://sandbox.taxbandits.com. At the time of API handshake, these keys will be used for identifying the user and to encrypt the message.
Security
The API has gone to greater lengths to safeguard users’ data from theft and other potential hacks and threats. This API doesn't support Cross-Origin Resource Sharing (CORS). Our improved data security architecture protects the data shared through API.
While the application subjects the data in rest to an end-to-end encryption process, data in transit are protected from malware attacks and other intrusions through robust network control protocols.
API Security
The API uses secure JSON parsers and strongly typed data to avert data intrusion. In order to clearly identify and address the errors, the status of API methods is communicated through HTTP codes.
Data in transit are protected by restricting the access received only from Secure Tunnel (TLS) and whitelisted IP addresses. Parallely, the API authenticates the messages and verifies the user identify through HMAC authentication and user tokens, respectively.
To protect the API against replay attacks, the idea of Nonce is implemented. The nonce is a random or pseudo-random number issued in an authentication protocol to ensure that old communications cannot be reused in replay attacks.
Hash-based message authentication code (HMAC)
The API uses a Hash-based message authentication code (HMAC) to validate the integrity and authenticity of the request received. Through HMAC, the message is encrypted using the SHA-256 algorithm involving a hash function in combination with a secret key. The HMAC authentication digest is computed using a composite of the URL, request timestamp, and a secret key.
The key identifier along with the digest, which is encoded using Base64, is combined and added to the authorization header. Once the data are received at the API’s end, the system recalculates the HASH and matches it with the user-sent HASH. This way the user is identified and the message is authenticated.
Object Fields
The API uses some common object fields across all API Endpoints so as to make referencing easier. As a user, gaining familiarity with these fields will help understand what needs to be sent in the Request and how to interpret the data received in the Response.
Submission ID
Let’s presume that a request is sent to the CREATE API Endpoint. This request can have the data of multiple clients or a single client. Once the request hits the Endpoint, a submission ID is created.
What happens is that the information contained in a single request is tagged to a Submission ID. This is a GUID created at the API end and will be notified back to the sender (you) as part of the Response. From now on, the user must reference this Submission ID in the follow-up requests initiated for Update, Delete, Validate, List, Get and Transmit End Points.
Record ID
A unique GUID is assigned to every form that is created by the API. This ID must be referenced for any follow-up requests.
For example, if a user wants to delete a few forms that were created by the API, a request needs to be sent with the Submission ID and Record ID. Accordingly, the API will delete the forms tagged to that Record ID.
Sequence
It is a unique number that the sender assigns to each record at the time of submission. Since the records are not created at this juncture, record ID would not have been created and thus identifying the list of failed records from a large group becomes difficult. That’s where the object field Sequence comes into play. In case the records are errored out, the 'Sequence' may be used at the receiver end to identify the records. The sender has to pass this as part of the request against each of the form data.
The response will have the Sequence along with the error details so that it’s easier to pull the record and make necessary corrections before submitting it again.
Webhooks
The API uses webhooks to notify users on the status of tax forms filed. Through this, the API gains an advantage to send a notification through an HTTP post, as well as, to respond to the same request with more information.
The user must configure webhooks from the developer control panel. Right now, the scope of this communication is limited to the status of tax forms.
Configure webhook
-
Log in to the developer control panel. Go to Settings >> Webhooks.
-
Enter the Callback URL and click on the Submit button. Ensure that the callback URL is valid as the API will post a sample JSON. The callback URL is expected to return HTTP 200 response code in order to remain active. If the API doesn’t return 200 response code, then the callback URL will go to inactive. You can retry posting the sample data to make the callback URL Active.
Receive webhook request from API
The API will issue an HTTP Post to the webhook URL every time when the status gets updated for a tax return. The request’s POST parameter will contain JSON data.
Respond to a webhook request from API
The user must respond to the webhook request by sending an HTTP 200 OK Response. Any other code other than 200 will be treated as an incomplete call. This API does not support 301 redirects, which will be treated as an error.
You are required to initiate a response to our webhook request within 5 seconds, if not, the request will be treated as timeout. If the API doesn’t receive a response during the 5-second time window or in case of an error, it will attempt to retry the connection for a total of 9 times over the next 24 hours.
We recommend users to respond to the webhook request at the earliest before initiating other internal communication processes. For example, if you wish to notify users whose returns were rejected by the IRS, the first thing you should do is to initiate a response to the webhook event by giving HTTP 200 OK response, and then attempt to email the rejected users. In this way, sending emails doesn’t get blocked while responding to webhook.
Steps to Validate Webhooks
Before you respond to a webhook request, validate if the request was sent by the Taxbandits Webhooks.
Follow the steps below to verify the authenticity:
Step 1: Read the headers: Signature & TimeStamp to obtain their values.
Step 2: Concatenate User's ClientId + \n + TimeStamp from the header.
Compute a hash (HMACSHA256 algorithm) of the above concatenated string with User's ClientSecret as the key.
Step 3: Convert the computed hash into a base64 string.
Step 4: Compare this base64 string with the Signature from the header.
- If there is a match, parse the JSON data for further processing.
- If there is no match, send the Response as 401 and stop processing.
Handling Errors
The API uses the commonly used error codes to stream the success or failure message to an API request. If validation checks fail during the creation of the business, the field errors will return the information in the Response, which may be handled at the client’s end. There are three components in error handling as outlined below.
Error Structure
{
    <<-- HTTP Status Code Fields -->>
    "StatusCode": 200,
    "StatusName": "Ok",
    "StatusMessage": "Successful API call",
    <<-- Submission Detail -->

    "SubmissionId": "6a30078c-7e5f-4db0-862a-d5e1266363f0",
    <<-- Form Success Details & Business Validation Errors -->>

    "FormRecords": {
        <<-- Collection of Form Success Details -->

        SuccessRecords": {
        . . .
    },
    <<-- Collection of Business Validation Error Details -->

    "ErrorRecords": {
        . . .
    },
    <<-- Collection of Data Validation Error Details -->


    "Errors": {
        . . .
    }
}
HTTP Status Codes
HTTP status codes are reported back in the Response JSON. Below is how the HTTP status codes are grouped:
| S No. | Code | Status | Description |
|---|---|---|---|
| 1 | 200 | Ok | Successful API call |
| 2 | 300 | Multi-Status | Multiple statuses are available for the request. |
| 3 | 400 | BadRequest | A validation error has occurred. |
| 4 | 401 | Unauthorized | Invalid authorization credentials. |
| 5 | 402 | CreditsNotSufficient | The Credit in your account is not sufficient to transmit all requested records. |
| 6 | 404 | NotFound | The resource you have specified cannot be found. |
| 7 | 405 | MethodNotAllowed | The Credit in your account is not sufficient to transmit all requested records |
| 8 | 429 | RequestLimitExceeded | The API rate limit for your organisation/application has been exceeded |
| 9 | 500 | InternalServerError | An unhandled error with this API call. Contact the API team if problems persist |
| 10 | 503 | NotAvailable | API is currently unavailable – typically due to a scheduled outage – try again soon |
<<-- HTTP Status Code Fields -->

{
    "StatusCode": 200,
    "StatusName": "Ok",
    "StatusMessage": "Successful API call",
}
Data validation errors
Before processing the individual records, the API subjects the data to some mandatory data validation checks, and errors observed will be reported under the object “Errors”.
"Errors": {
<<-- Error on an incorrect TIN format -->
    {
        "Id": "F00-100088",
        "Name": "Business.EINorSSN",
        "Message": "Enter a valid EINorSSN"
    }
}
Business validation errors
To process the individual records, the data is subjected to business validation checks, and errors observed will be reported under the object “ErrorRecords”.
<<-- Collection of Business Validation Error -->
"ErrorRecords": {
<<-- Business Validation Errors on Record with Sequence 8 -->

    "RecordId": "0e6b053a-3e67-4559-a09f-5631bd06f5e9",
    "Sequence": "8",
    "Errors":
    {

<<-- Error on Recipient First Name required -->

        "Id": "F00-100239",
        "Name": "Recipient.FirstPayeeNm",
        "Message": "FirstPayeeNm is required",
           }
},